Page 1 of 1
Cracked Blade Photos
Posted: Mon Apr 25, 2011 1:43 pm
by bryancobb
Here's the pictures I collected when my blades cracked.
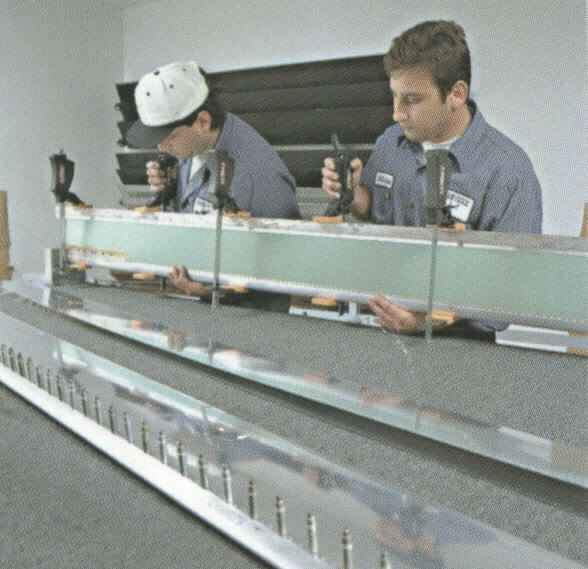
1) Factory Building -404's
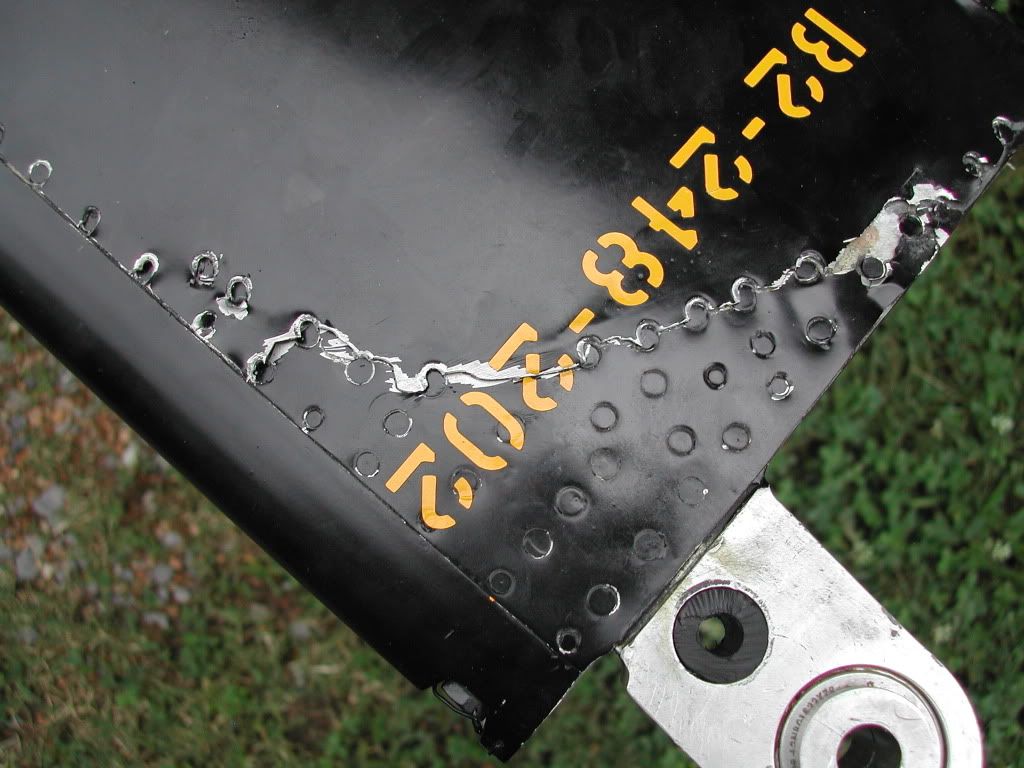
2) Mine 1
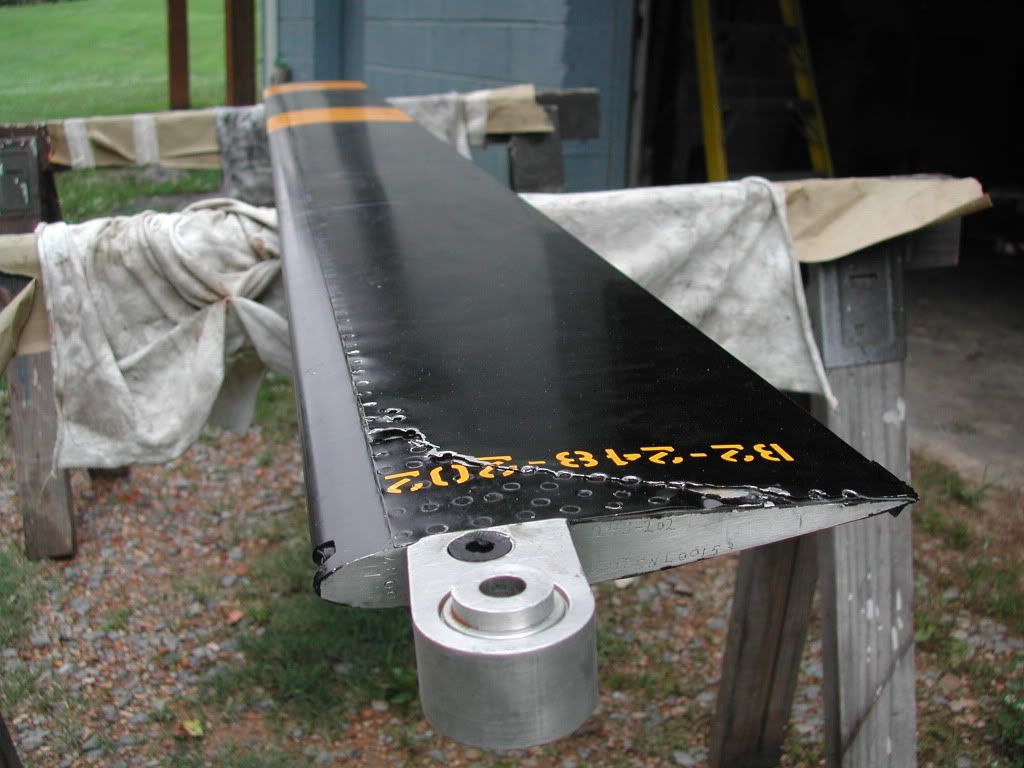
3) Mine 2
4) New Zealand 1
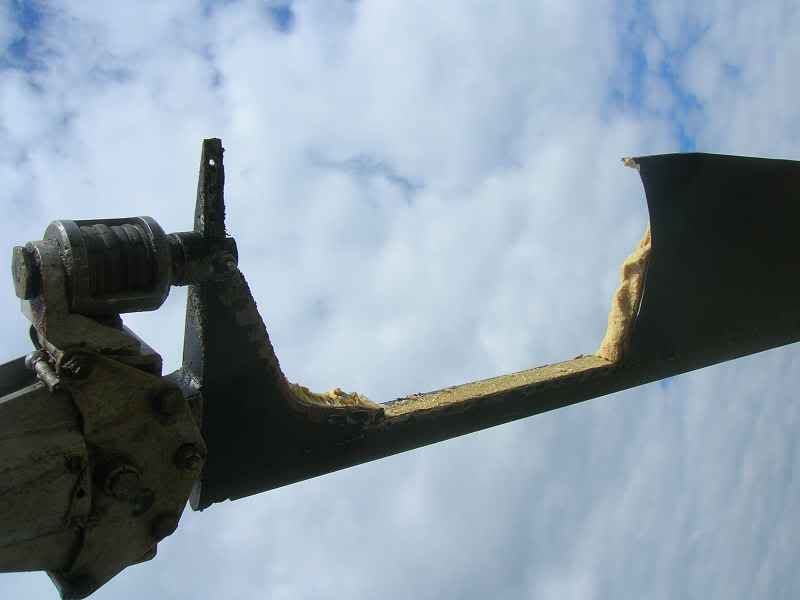
5) New Zealand 2
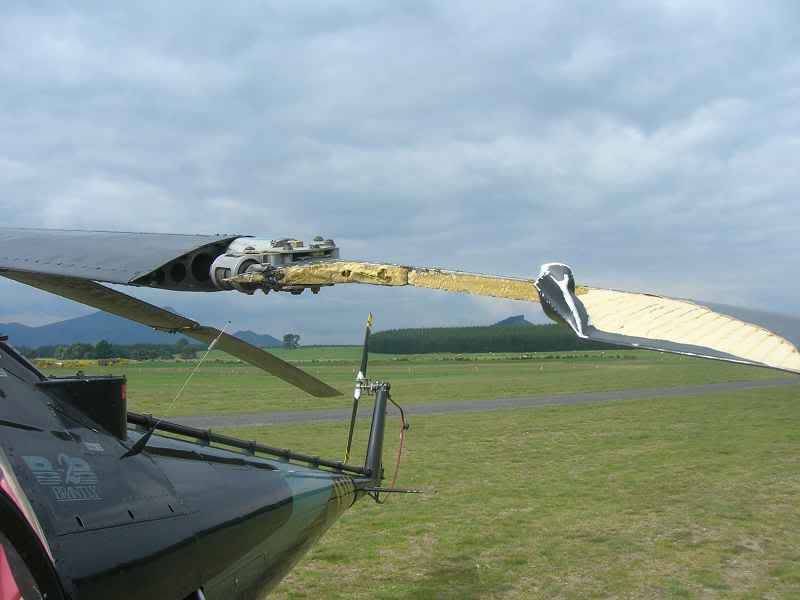
6) New Zealand 3
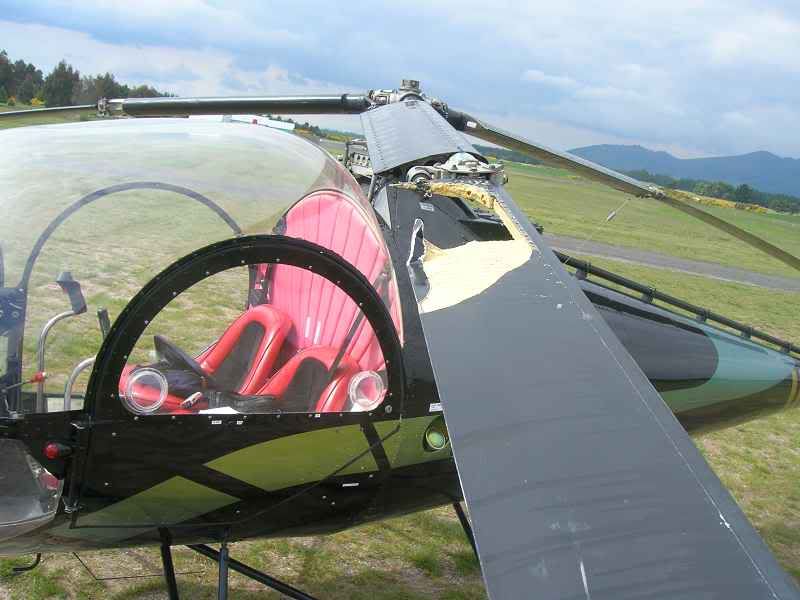
7) New Zealand 4
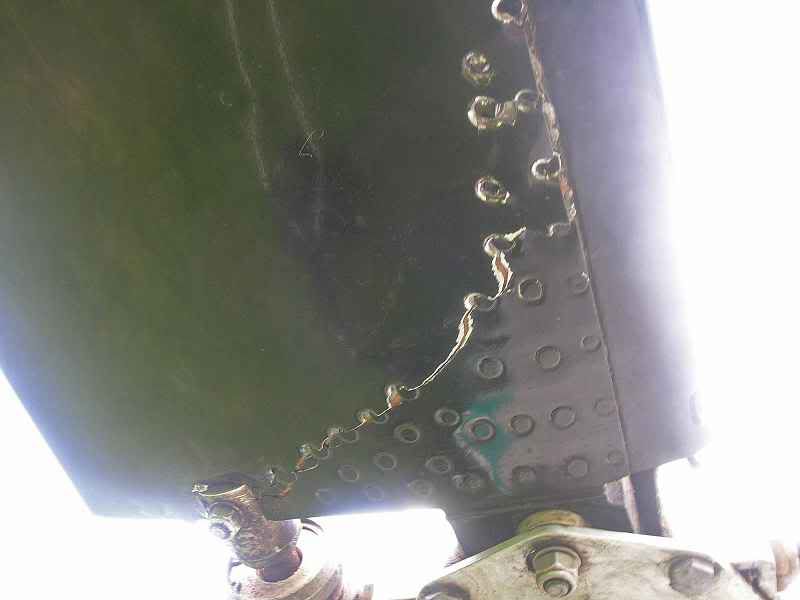

New Zealand 5
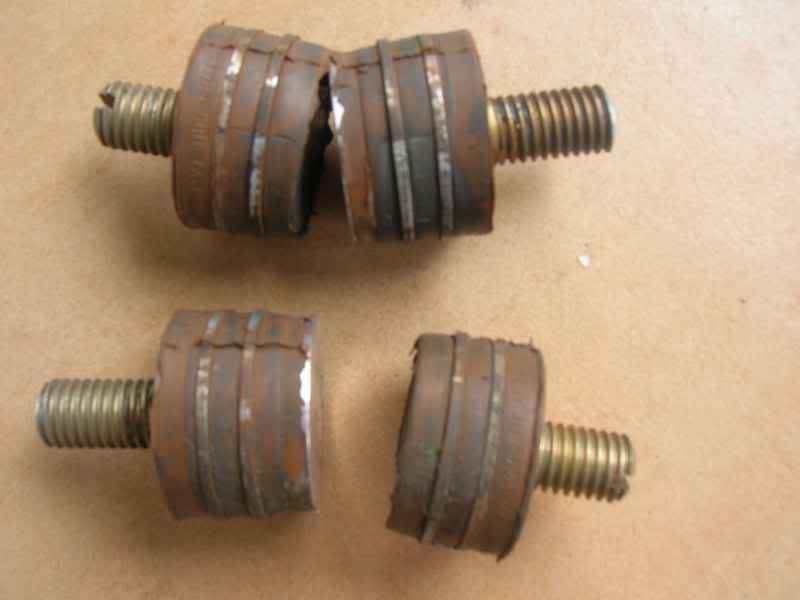
Re: Cracked Blade Photos
Posted: Mon Apr 25, 2011 2:27 pm
by Brad Bowles
Bryan could you feel the blade change or was it caught on preflight?
Re: Cracked Blade Photos
Posted: Mon Apr 25, 2011 3:09 pm
by 9121u
FOR BLADES to crack like that something was definitely rigged wrong.or bad sprag clutch sticking or bad start up sticking centrifugal clutch and the dampeners where working hard to debond them.. you can see the gray mud from the cages means there working hard Ive bin around brantlys and seen a lot and this craft was not right.and also there should not be that much grease coming out of the pylons seals where definitely ban Ive seen this before.thanks for posting ....tom
Re: Cracked Blade Photos
Posted: Mon Apr 25, 2011 6:25 pm
by DelDammann
I agree that there was some cause other than normal use for the crack to happen. I had blade crack some years ago , it had not progressed passed four rivets.
when I removed the blade I found the bearing had brindeled and was very hard to turn off one spot. I assumed that was the cause of the crack. I replaced it with a used blade from Harold and have had no more problems.
On a related subject, the FAA will allow an owner of an aricraft ( if the aircraft is no longer manufactured or parts are very difficult to obtain) to make any part of the aircraft
if it is equal to or exceeds the original part. The question is, does anyone have orignal drawings, specs. or information on materials or construction of the blades?
There must be people around who worked at brantly that would have that knowlege. With todays CNC machines and avilable tooling, making blades is not rocketry.
Also I have not been able to find anything that would prevent someone from reskining a blade and signing it off as a major repair. I know they repair blades on bell 206 and
they would be a lot harder to repair than the simple brantly blades. Del
Re: Cracked Blade Photos
Posted: Mon Apr 25, 2011 7:43 pm
by bryancobb
Brad Bowles wrote:Bryan could you feel the blade change or was it caught on preflight?
No, I didn't feel anything abnormal. Sometimes I would feel a slight minor vibration for a few seconds. This time I was solo, and did a shallow 180 turn to approach into a confined area and the slight vibration started and didn't stop until I landed. I didn't think anything of it, but I found the cracked blade on my before-flight.
I didn't "cowboy" the Brantly. I almost always flew it gently because I was aware that aggressive maneuvering causes extreme lead/lag and may crack the blades.
All of my bearings in the head were new and had less than 75 hours on them. The dampers were old. My rotor brake worked great and I RELIGIOUSLY turned the rotor backwards before startup. Never had snatched the blades once. That blade DID have a crack already that had not grown in 50+ hours. I had marked it.
Now I had a second one crack more severely (no pics posted) and I had a passenger. He was a Brantly owner. I was showing him how to do autos and we were doing auto after auto with fairly aggressive stops at a 3 ft hover. The last one caused a moderate vibration that got my attention. I knew it was my yellow blade. It had a 1 rivet crack prior, also. Well, on this blade, the aluminum skin rolled back on about 6" and the foam had chunks missing.
It never scared me because I had seen where the NZ guy had lost 14" of his blade and still flew. But...the guy with me SOLD HIS BRANTLY the next week. The blade delaminating in flight really scared him!
Re: Cracked Blade Photos
Posted: Mon Apr 25, 2011 7:53 pm
by bryancobb
This is purely my opinion here, but I THINK the hinge block/root rib tapers too drastically over to where the dampener attaches. I could grab the skinny "tail" with my bare hand and using a dial indicator, I could "flex" this root rib 0.010" to 0.012" at the AN-3 bolt hole where the dampener fork attaches.
The aluminum skin is only 0.018" thick and can't take much of this.
Re: Cracked Blade Photos
Posted: Mon Apr 25, 2011 8:18 pm
by bryancobb
Attempt at reskinning. After my second blade failed, I tried to learn all I could about how a blade is put together. What better way than to attempt a reskin myself. Here's what I did.
A super-helpful guy from the factory provided me a copy of the factory blade drawing. (no I don't have it any more. The owner of my ship does) The factory guy also verbally filled me in on the process. He got permission from the boss' and sold me a prepunched, prebent skin and a OEM foam core. I ordered the specified rivets from Aircraft Spruce and got a bag of 200 hardened steel pins from McMaster-Carr, and a small arbor press to punch out the old rivets. (DO NOT drill 'em out)
I obtained the correct rubber epoxy called "b2-tan" from the manufacturer. Can't remember the name. It only has a 45 minute working life after mixing and after mixing, it must be weighed out in 2 equally measured amounts for top and bottom. This takes time and it eats away at the 45 minutes.
I got a thick vinyl shower curtain from Lowes and made a Vacuum bag sock. I converted an old refrigerator compressor into a vacuum pump.
I built a plywood box for a cure oven and put flood lights and 4 thermometers in it. I experimented with different bulbs until the prescribed cure temp was held accurately for an extended period.
Long story short...It is a 2-man job and I did it alone. This took time and by the time I got the vacuum bag sucked flat, the adhesive was getting a little stiff. The next day when I removed it from my homemade autoclave, the aluminum stuck up about 0.005 above the spar, right at the point to kill lift and disrupt laminar flow.
I gave up and sent it to Harold and bought one of his blades.
TRUST ME WHEN I SAY THIS... ASSEMBLING ONE OF THESE BLADES HAS TO HAPPEN VERY QUICKLY AND YOU ONLY GET ONE CHANCE. THE ONLY WAY TO BE SUCESSFUL IS TO BE EXPERIENCED. I am quite sure that the guys at Brantly that did this task, fouled up several blades while gaining the experience to do it successfully.
Re: Cracked Blade Photos
Posted: Mon Apr 25, 2011 8:48 pm
by Brad Bowles
I'm told that the factory had reskinned blades at one point. There is a blade guy in California that repairs blades on Hughes and other helicopters. He works with a DER and has been able to repair blades other shops can't. I think between his shop and his DER he could reskin one.
Re: Cracked Blade Photos
Posted: Mon Apr 25, 2011 9:03 pm
by 9121u
I just notice on picture #4 there is no safety wire on the damper cage its always on the trailing edge of the damper and the damper it self is puckered out in the middle looks like it may have bin shimmed up to tightly????? just my thoughts...still trying to clear up the.... blade cracking?? issue.you have to look at all causes...i hope the FAA does the same...i don't want to be grounded for some one else mistakes..thanks...tom
Re: Cracked Blade Photos
Posted: Tue Apr 26, 2011 12:03 am
by seneca2e
Great post Bryan. I'd seen the New Zealand photos before(I think the guy sent them out to about everyone and I was glad to get them to study as well). O.f course this type of stuff often leads to a knee jerk reaction otherwise known as an A/D. You have to know all the facts before a determination can be made and how to proceed.
Do you have any photos of the other one you mentioned?
It sure would be pivotal to the fleet if someone could get an approval to reskin the blades. Since the factory did not establish a field procedure to do it the only venue would be a DER or field approval. I don't think you could convince the FAA to issue any kind of field approval. An "owner produced" part by a repair station capable of properly reskinning/bonding the blades would probably land the repair station in hot water as clearly they would be producing the part for resale and I doubt you could claim it was a "owner produced part" even if the repair station wanted to risk it.
The factory itself is probably the best hope. Just as they issued the onerous sb they could also issue a field procedure to reskin the blades. Thus even though they are not currently capable of doing it they could issue a approved procedure to do it in the field. They should have thought that thru and had it ready to go as an alternative before issuing a SB with no solutions.
Re: Cracked Blade Photos
Posted: Tue Apr 26, 2011 7:16 am
by Brad Bowles
Repair stations do repairs like this with DER approval. It just takes finding the right shop with a knowledgeable DER.
Re: Cracked Blade Photos
Posted: Fri Apr 29, 2011 2:10 pm
by BirdDog
Thanks for the constructive posts Brad. The "factory" is quite willing to provide technical information to a qualified shop to allow them to create their own approved reskinning/repair process. This could include drawings, material specifications, material manufacturers, and process specifications.
Re: Cracked Blade Photos
Posted: Fri Apr 29, 2011 3:38 pm
by 9121u
THATS GREAT NEWS i new that brantlys had a future and if it is a AD i don't think it will be a big deal every one has to hang in there for the long haul like KYLE said before......its the best news i heard yet ....just find some one to do it...that's better than nothing....THANKS TO ALL....tom


 New Zealand 5


