Page 1 of 1
Struts
Posted: Mon Apr 05, 2010 11:23 pm
by seneca2e
Looks like the struts have been serviced with possibly hydraulic jack oil or maybe even gear oil. I've seen this before on some airplanes as well. Maybe it's done for damping purposes or leak remediation but it's spec'd to have red 5606 fluid in there so I might need to rebuild one or more of these. Not really looked much at them yet. Do they require a spanner wrench to get apart and do you need to support the fuselage to remove the struts one at a time to rebuild or will the remaining ones support it satisfactorily?
Re: Stuts
Posted: Tue Apr 06, 2010 2:37 am
by fixnfly
The struts do require a spanner wrench to get them apart.I got mine from brantly about a year ago but i'm not sure what is going on now as far as tools . Anyway if you need a set , i'll lend mine out just please make sure i get them back. Keep em flying. Bill Mott
Re: Stuts
Posted: Tue Apr 06, 2010 3:50 am
by bryancobb
Yes,
You MUST support fuse b4 removing a strut. A 2X4 cut to the right length under the T/R guard at the point, and you can take off both rear struts. When rebuilt and back on... push the T/R guard to ground and put a sandbag on it. Then you can remove both fron t struts.
Re: Struts
Posted: Tue Apr 06, 2010 10:46 am
by seneca2e
Thanks for the tips guys and the generous offer Bill. I'll see if I have anything that will work. I really like having the right tool for the job so hope to acquire or make some Brantly tools as I work on it. Anyone having any Brantly tools they'd like to sell pm me!
Re: Struts
Posted: Thu Sep 06, 2012 10:32 pm
by seneca2e
I finally got the answer on what was used in the struts. Regular 10w30 oil. I've seen this on aircraft before as well. I'm not recommending this but actually a couple of experienced mechanics liked this route. Their rationale was the weight changed viscosity with the temperature, it's not as hard on painted struts and gear, and finally they're probably gonna leak some so just keep em filled with the oil(which leaks a little less).
Re: Struts
Posted: Wed Oct 17, 2012 7:45 pm
by seneca2e
Well I rebuilt the aft two struts today. Actually the orings in there looked good so I don't know if I did much good until I get them back on(painted them and waiting for them to dry). I changed one rubber biscuit as well. Had to modify a pin wrench to hold the oring cup and had a universal spanner that worked good for gripping the outter "nut". I wished I had the darn tool that took the lower orifice holding plug assembly off(after removing the one screw) but it already had a few scars in that area that didn't hurt anything(part that overlaps the upper strut pipe) and just taped it good and removed it with just a little pressure from some vise grips. Next time I'll try to make a proper tool. If anyone ever knows of any of these strut tools for sale I'd love to just buy them but haven't run across any. I called the factory when it existed and even then they didn't have any. Also removed the aft skid shoes for repair(adding 1/2 inch wide 3/16" thick steel strip for wear strip) which is what was previously used. Two new tires(6 ply) and tubes and some repairs to the wallowed out holes in the ground handling wheel assemblies and that'll get the landing gear finished.
Re: Struts
Posted: Thu Oct 18, 2012 4:25 am
by Ron Spiker
Sounds like you're making pretty good progress. Congrats.
Re: Struts
Posted: Sat Jan 26, 2013 11:01 pm
by seneca2e
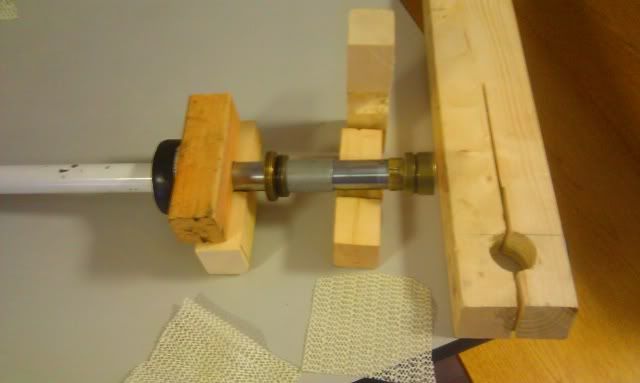
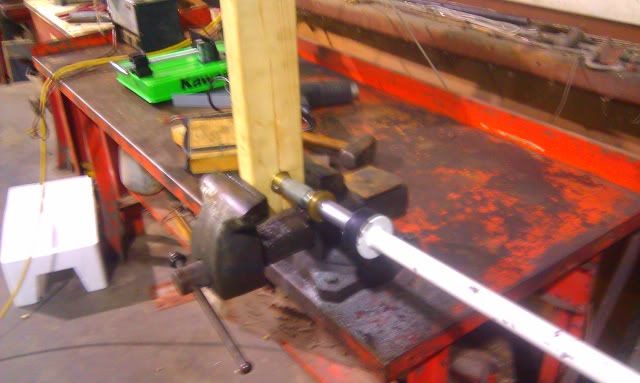
Well I had to do one of my front struts yesterday. Not because it was leaking but because it was sticking. However I ran into a problem getting the brass plug off. The other two came off relatively easy with tape and a pair of vise grips gingerly applied(do not get anywhere near the bearing surface but rather on the internally threaded end). Not this one though it was TIGHT. Even tried Bryan's suggestion of a couple of wooden paint sticks and tape and a little heat to the plug. No joy just wouldn't even begin to loosen. So since Brantly is no longer around and special tools are hard to come by I grabbed a 1 3/8" hole saw and bored a hole in about a two foot long piece of 2x4 and put a double kerf thru the middle of it on a table saw.

Wrapped the plug with some of that gripping non slip cloth you can buy at Walmart and then clamped the 2x4 with a couple of clamps. On the loosen phase I also made a couple of "yokes" with the proper size hole to clamp around the shiny part of the strut. I just clamped it right down on the bench then took a about a 2 foot piece of 4x4 and whacked the 2x4 and finally the brass plug yielded. Going back together I just used the "special tool" in the vise and used the jam nut on the end of the rod end to tweak it the last bit to line up the hole for the retainer screw(won't work on taking it apart as the jam nut loosens hence you have to clamp the strut with the other yoke pieces.

By the way you do not have to remove the aluminum plug in the bottom of the brass plug. If you do(and it serves no purpose too) be prepared for that internal retaining ring to shoot about 30 feet and 8 inches away and it will be a bear to find

Another suggestion is to add Granville stut seal in the recommended ratio (1 to 8 ) to the 5606 hyraulic fluid. These days as our aircraft are getting older we find that simply replacing the seals and orings often don't remediate the problem. New seals, orings, and the strut seal seem to do the trick. The strut seal is FAA approved and is said to slick up and seal the metal as well. Don't know about that but I think it definitely cuts down on leaks and air loss(in pressurized shocks which these are not but that shows you the stuff works). I flew it a couple of hours today and it worked smoothly. So far so good!
 Wrapped the plug with some of that gripping non slip cloth you can buy at Walmart and then clamped the 2x4 with a couple of clamps. On the loosen phase I also made a couple of "yokes" with the proper size hole to clamp around the shiny part of the strut. I just clamped it right down on the bench then took a about a 2 foot piece of 4x4 and whacked the 2x4 and finally the brass plug yielded. Going back together I just used the "special tool" in the vise and used the jam nut on the end of the rod end to tweak it the last bit to line up the hole for the retainer screw(won't work on taking it apart as the jam nut loosens hence you have to clamp the strut with the other yoke pieces.
  By the way you do not have to remove the aluminum plug in the bottom of the brass plug. If you do(and it serves no purpose too) be prepared for that internal retaining ring to shoot about 30 feet and 8 inches away and it will be a bear to find